Learn Freestyle Swimming from the Fundamentals: The 'Entry & Glide' Technique – How to Enter the Water and Prone Forward Movement
The Art of Getting Your Drink "Sweet" Like a Knife Striking Butter !
Hello everyone, today Coach Visark has brought us to the final article in the module on Propulsion!
In the previous lesson, we learned how to rhythmically "bring the elbow forward" during the Recovery phase – swinging the arm forward. Now, having completed its "aerial" journey, the arm will return to its "home": the water's surface.
Today, we'll dissect the technique of entering the water in freestyle swimming to complete the perfect arm stroke cycle: Entry & Glide.
This is a special phase, marking both the end of the arm swing and the beginning of the next thrust. And here's a little secret: if there's a real "resting" moment in freestyle swimming, it's right here!
Learning Objectives
After reading this article, you will:
Master the technique of smooth entry into the water to minimize drag.
Understanding the purpose of the glide phase and why it's a true "resting" phase.
Learn how to connect the forward stretch to support the hip rotation.
Technical Analysis: 'Launching the Anchor' and Moments of 'Peace'
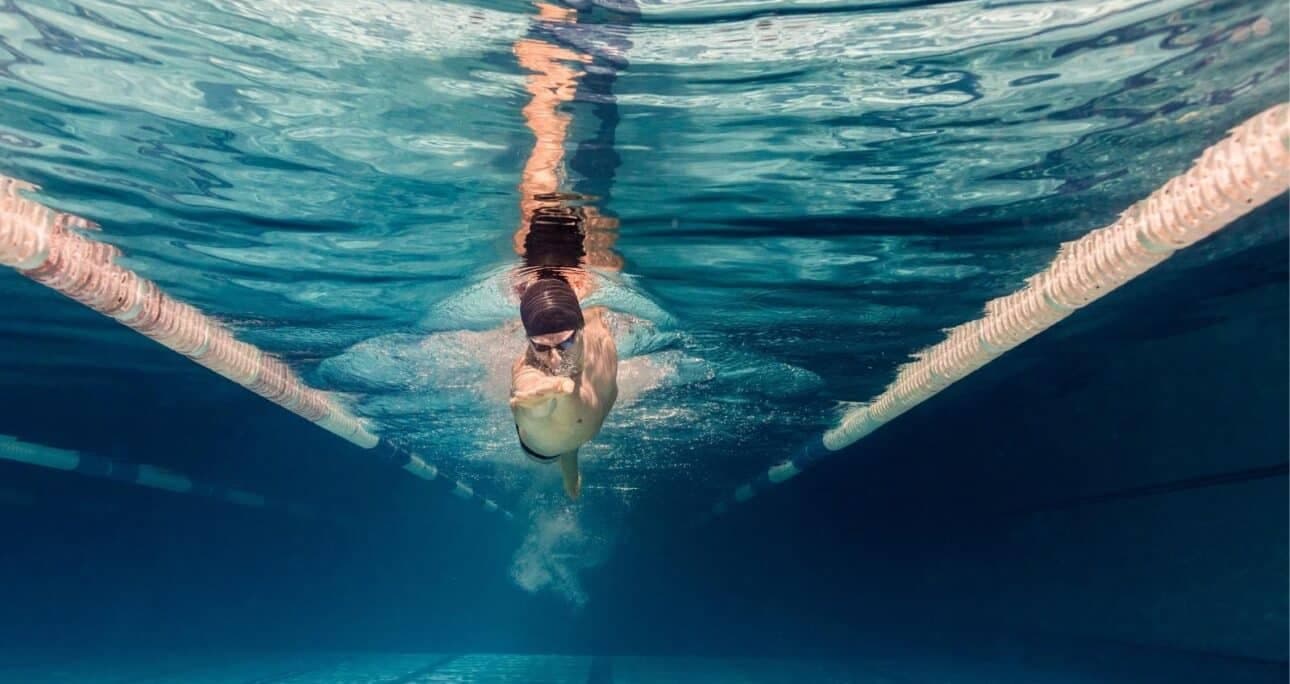
1. Entry Phase – Sweet as a Knife in Butter
The quality of a successful "water entry" depends heavily on how well you "enter the water." A "clean" and "sweet" water entry requires ensuring:
The order of entering the water: To ensure your hand is at the optimal angle, let the tips of your index and middle fingers touch the water first. Then, your entire hand, wrist, and forearm will follow suit, smoothly sinking into the water.
Hand Position and State: The hands should enter the water slightly further from the head , aligned with the shoulders. Most importantly: the elbows should remain slightly bent upon entry into the water , not fully extended in the air. The forward arm extension must be performed underwater. This creates space and momentum for an effective glide.
Logical purpose (Why are air bubbles the enemy?): A smooth flow into the water minimizes air bubbles. Air bubbles reduce the density of the water, turning a "dense" mass of water into a much thinner, "bubbling" mixture. Pressing against this is like pushing against a porous wall instead of a concrete one. Your "anchor" will slip, and you won't be able to generate a strong thrust.
2. Glide Phase – A Moment of True 'Rest'
Once your hand enters the water, don't immediately pull. It will continue to reach forward, just below the water's surface.
This is the precious "resting" moment we've been looking for. During this 1-2 seconds of gliding forward, your body is in its longest "torpedo" position, the inertia from the pull of your other arm is propelling you, and the muscles of the arm that just entered the water are relatively rested, preparing energy for the next "push."
3. The Golden Connection: Reaching for Hip Rotation Support
The forward stretch isn't just for resting. It has another extremely important task: supporting the "Hip Conductor ." When you actively stretch your right arm forward, it pulls your right shoulder along and helps your right hip rotate downward naturally and easily. This action creates a seamless and powerful connection throughout the entire kinesthetic chain of the body.
Common Mistakes
'Slapping' the Water: The arm is thrust flat into the water, creating a "splash" sound, generating a lot of air bubbles and resistance.
'Braking': Entering the water and then bending the elbow without extending it creates enormous drag.
Cross-over: Entering the water and extending the arms diagonally across the body's midline violates the "axis plane" principle and causes the body to sway.
Practice Corner: Getting Into the Water & Gliding Forward
1. Exercise: One-Arm Entry Drill
Objective: Focus 100% on the feel of one hand.
Instructions: Extend one arm straight forward. The other arm performs only the cycle of Recovery -> Entry -> Glide. Repeat. Focus on entering the water with your fingertips first and stretching as far as possible underwater.
2. Exercise: Catch-up Drill
Objective: To exaggerate and force the body to perform the forward glide.
Execution: This is a classic exercise. The right hand is only allowed to begin pulling when it has touched the left hand extended in front. This exercise will give you plenty of time to feel the moment of "rest" and glide.
Advice from Coach Vi (Tips)
"Imagine a bracelet floating on the water, right in front of your shoulder. Your task is to gently 'slip' your hand through the bracelet without touching the edges."
To do this, you must first enter the water with your fingertips, precisely and neatly, creating the smallest possible 'hole' on the surface of the water.
Summary & Homework Assignment
In summary: Entry should be "smooth," Glide is for "rest," and Reach forward supports Hip Rotation. This is the final link to complete a perfect arm stroke cycle.
Homework: Next swim, try the Catch-up Drill . Swim 4x50m, focusing on the feeling of "waiting" and gliding in that moment.
Congratulations! You've completed the entire "main engine"—the arm stroke! In the next module, we'll learn how to assemble all the parts together in the Coordination module!
Sincerely, Coach Pham Thuy Vi